For many years I’ve been fascinated by laser engraver/cutters, seeing cool Raspberry Pi cases, game boards, and other stuff. I’ve drooled over Epilog demos at Maker Faire and scanned CraigsList for used lasers.
The problem is price. The cheapest Epilog lasers are $8,000.
Recently a company called Glowforge has been crowd-funding an “affordable” laser for around $3,000. It looks impressive, with a clever use of a camera to preview where the engrave or cut will be placed on the actual material.
But that was still too pricy, plus they are just doing crowd-funding now, the actual thing won’t ship until next year.
Then I discovered the “K40” laser.
In the last few years, hobbyist makers have been buying cheap lasers from China nicknamed “K40” (based on the original model number) that are sold as 40-watt lasers, although based on tube length, the actual max output is more like 32-watt.
In the last year or so, the price of these has dropped significantly, now they can be purchased for around $350. That’s an order of magnitude cheaper than other lasers! Finally, something in my price range.
Is there a catch? Of course.
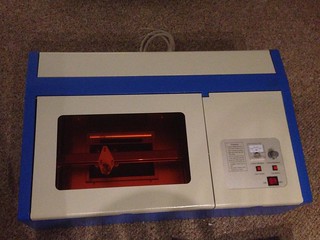 The K40 has a relatively small cutting area, around 8×11, a fairly low power tube (cannot cut metal, cannot engrave metal or glass without special paints). More than that, they are cheaply made, with a steel case that is somehow bulky and flimsy at the same time. The wiring is sometimes shoddy, and the accessories they come with (ventilation fan, cooling pump) are laughably cheap. The driver board is proprietary, and the software is an ancient version of CorelDraw that won’t run correctly on a modern copy of Windows, along with a proprietary plugin for it called CorelLaser that is poorly translated into English and requires a USB dongle to be plugged in to run. There is no Mac or Linux software.
But, I was prepared for this. I read lots of tutorials and watched lots of videos for what problems I would encounter and what parts would need to be replaced to get a decently running machine.
And I ordered it from a place on eBay. $330, including shipping.
I also ordered some parts I knew I’d want to upgrade: the exhaust fan, connector and tubing, the laser head, lens, cutting surface, and maybe the water pump.
 It arrived pretty quickly, and I carefully examined it for any damage, everything was intact, and the wiring looked good. I didn’t even use the fan or vent tubing that came with it, instead using the replacement parts I bought. I did use the water pump that came with it, and the stock laser head and lens.
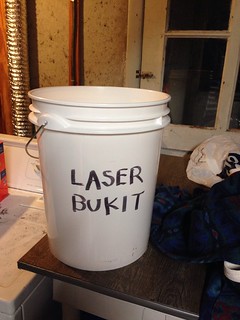
For cooling, I bought a 5-gallon bucket, filled it with water and put the submersible pump that came with the laser inside, with laser inlet hooked to the pump and outlet hose going back into the bucket. I wrote “LASER BUKIT” on the side with a large Sharpie.
 Surprisingly, everything worked out of the box. The CorelDraw was super-old, so I bought a somewhat newer version (X5) for $100 (the latest version, X8, is like $600) so it would run on Windows 10. But I got everything set up and working the first evening of using it.
One thing I quickly discovered was that my ventilation setup didn’t work, I had opened a basement window and vented the hose against the screen, but hadn’t noticed there was a second pane of glass in front of the screen. D’oh! An easy fix, but really showed how much smoke gets produced and how necessary good ventilation is.
Another thing I discovered is that cutting = fire. Engraving produced a lot of smoke, but cutting was producing flames. Small flames that the negative pressure would extinguish quickly, but still, fire. So the next day I installed the air assist laser head, new lens, and air assist pump I bought. Presto, no more flames. The air assist blows air past the front of the lens and down where the cutting is happening, which pushes smoke away from the lens and also prevents fires, both good things.
The cutting bed it comes with is weird, it’s a tiny clamp and is all but completely useless. I removed it and installed the honeycomb surface I had ordered, roughly positioned at the right height by stacking some scrap wood under it.
Next I made my first big mistake, I decided to remove the internal vent, it sticks out into the cutting area and some people removed it and said it was better without it. I didn’t want to remove the laser tube or x-axis assembly to get at the vent, so decided to remove it in place by cutting it apart with tin snips. This was an arduous and painful process, and once I finally got it removed, airflow was worse, instead of cleanly exiting via the vent, it swirled around inside. There was no leaking, but it wasn’t being directed out as well. What I *should* have done is just cut the end of the vent off, instead of removing it entirely. Now I will have to fabricate a replacement vent to direct the air better. Live and learn.
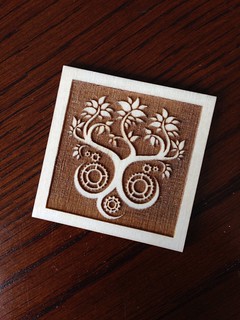
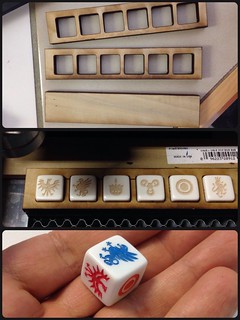 But through all of this I was able to cut and engrave, including making a jig to hold blank dice and doing some laser-engraved dice. Much better success than I had with an early 3D printer!
Then near-disaster. One night I was cutting out a bus pattern (Ronin is obsessed with “Wheels on the Bus”) and I noticed the power output was a little low. I thought nothing of it, slowing the movement of the laser down a little to compensate and cut through the 3mm plywood. My laptop battery was low and it was late, so I decided to go to bed. I shut everything down. The next day, I went to finish the bus, and when I turned on the water pump, nothing happened. It’s quiet, it can’t be heard over the ventilation blower, so it must have died at some point that night without me noticing.
Usually even a few seconds without active cooling is enough to destroy a laser tube. I went out to Lowes and bought a pond pump and a couple adaptors to size the outlet down to fit the laser’s water hose, turned the pump on, got the bubbles out of the laser tube, and did a test fire.
It still worked! Hooray! Then the test fire button broke, stuck down. I cut power to the laser so it didn’t keep trying to burn a hole in my scrap wood.
If I had destroyed the tube, it wouldn’t be the end of the world, but it would cost around $200 to replace, so I’m glad it still works.
I also noticed the test fire marks were a little oblong, I think my rough jostling of the case to get the bubbles out of the laser tube knocked my mirrors slightly out of alignment. Everyone said calibration was a must, but it seemed pretty close out of the box, so I’d never bothered to calibrate, but guess I will now!
 So that’s where I am now. Back up and running, albeit needing a bit of calibration and a new test switch (maybe I will use an arcade button).
Overall I’m happy with my K40, yes, it’s cheap as hell, but it produces good results and has a great online community of fellow K40 owners for support.
Actual costs of K40 laser and upgrade parts. Yes, parts double the cost of the laser, but it’s still less than 1/4 the cost of a Glowforge, or 1/10 the cost of an Epilog.
K40 Laser              330
CorelDraw X5           100
honeycomb surface       25
vent hood               12
vent blower             31
vent tubing             12
12v power supply        22
air assist              14
lens                    32
air pump                36
coiled tubing            7
switch board            15
LED lights              25
water pump              65
nozzle adaptors          8
bucket                   5
--------------------------
Total                  739